Understanding Google Analytics 4 ecommerce tracking
In this article, I am going to show you how to set up ecommerce tracking in Google Analytics 4 (GA4) using Google Tag Manager (GTM).
With Google Analytics 4 properties, ecommerce implementation is a bit different compared to the legacy version, also known as Universal Analytics. I recommend following the developer’s documentation Ecommerce (GA4) Developer Guide alongside this article.
If we compare Google Analytics 4 vs Universal Analytics there are a few similarities and differences, as below.
1) Schema changes
While setting up the ecommerce events we need to pass the different schemas like product details, currency, promotions, etc.
Just to give you an example, earlier in Universal Analytics if we wanted to pass product name, we used to pass it using ‘name’ but in case of GA4 it is just ‘item_name’.
Another example, if you wanted to measure a promotion (when a user clicks on any promotion link), in universal analytics we use to pass this using ‘promoClick’ but in the case of GA4, it has now changed to ‘select_promotion’.
The table below will provide you with details on the different schemas and changes.
| No | Google Analytics 4 | Universal Analytics | Description |
| 1 | view_promotion | promoView | When a user views a promotion |
| 2 | select_promotion | promoClick | When a user clicks on a promotion |
| 3 | view_item_list | impressions | View of product impressions in a list |
| 4 | select_item | productClick | Click on a product |
| 5 | view_item | detail | View product details |
| 6 | add_to_cart | addToCart | Add product to cart |
| 7 | add_to_wishlist | N/A | Add product to a wishlist |
| 8 | remove_from_cart | removeFromCart | Remove product from the cart |
| 9 | view_cart | N/A | View shopping cart |
| 10 | begin_checkout | checkout | Initiate the checkout process |
| 11 | add_shipping_info | checkout_option | Add shipping info during the checkout |
| 12 | add_payment_info | checkout_option | Add payment info during the checkout |
| 13 | purchase | purchase | Purchase product |
| 14 | refund | refund | Refund product |
| 15 | item_id | id | Product ID / SKU |
| 16 | item_name | name | Name of the product |
| 17 | item_list_name | list | Product list name |
| 18 | item_list_id | N/A | Product list identifier |
| 19 | index | position | Product position in the list |
| 20 | item_brand | brand | Product brand |
| 21 | item_category | category | Product category |
| 22 | item_category_2 | category | Product category 2nd level |
| 23 | item_category_3 | category | Product category 3rd level |
| 24 | item_category_4 | category | Product category 4th level |
| 25 | item_category_5 | category | Product category 5th level |
| 26 | item_variant | variant | Product variant name or description |
| 27 | affiliation | N/A | The store affiliation |
| 28 | discount | N/A | Any discount on product |
| 29 | coupon | coupon | Coupon code used |
| 30 | price | price | Product price |
| 31 | currency | N/A | User currency |
| 32 | quantity | quantity | Product quantity |
| 33 | promotion_id | id | Promotion ID |
| 34 | promotion_name | name | Promotion name |
| 35 | transaction_id | id | Unique ID for the transaction required for purchase and refund events |
| 36 | value | revenue | Product revenue |
| 37 | shipping | shipping | Shipping charges for selected product in cart |
| 38 | payment_type | option | The payment method sent with add_payment_info |
2) Data layer implementation
You might be thinking to update your data layer according to the new schemas, but wait!
If you are using Universal Analytics for your ecommerce website do not update your current set up.
The reason behind this is the new schemas are not backwards compatible and hence can break your current (Universal Analytics) set up.
The good news is that for the majority of the schemas they are forward compatible and Google will translate your Universal Analytics events to the GA4 App + Web custom events.
The best thing to do to keep both versions of analytics active and running is to update your current set up to add GA4 App + Web specific dataLayer and schemas along with current schemas. This way it won’t break your Universal Analytics and the GA4 App + Web will also have its required schemas.
Now let’s get started with setting up ecommerce tracking in Google Analytics 4
Setting up ecommerce tracking in Google Analytics 4 using Google Tag Manager
Note: Ecommerce events can be also implemented using global site tag (gtag.js). In our case, we will be using Google Tag Manager.
While implementing the ecommerce tracking, we need to define or modify our DataLayer on the page and this needs development work to update the values.
If you are not familiar with the dev work you can ask your developer to carry out DataLayer implementation. Once the DataLayer is defined you can configure the DataLayer variable in GTM.
Follow the below steps to create an ecommerce DataLayer variable.
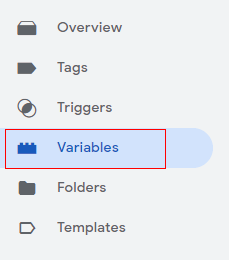
Step 1: Log in to your Google Tag Manager console and click on ‘Variables’ in the left-hand side menu.
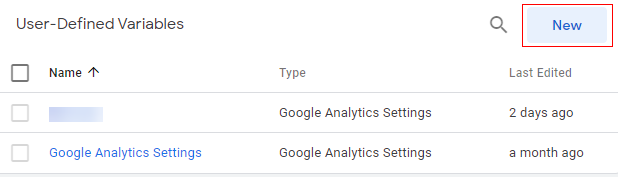
Step 2: Click on ‘New’.
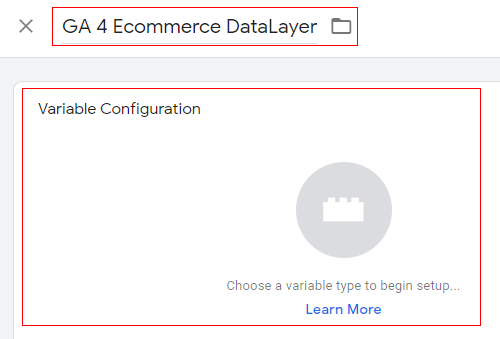
Step 3: Give a proper name to your variable and click on ‘Variable Configuration’.
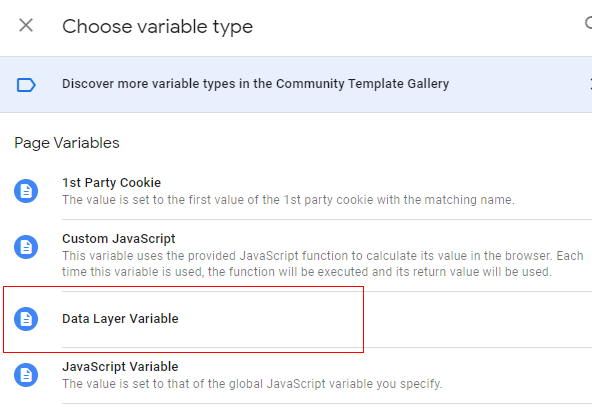
Step 4: An overlay will appear like below. Select the Data Layer variable.
Step 5: Variable configuration will open like below. Type ‘ecommerce.items’ as the Data Layer variable name.
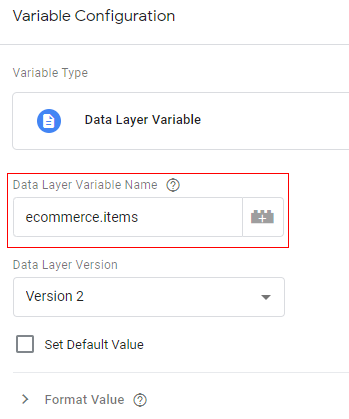
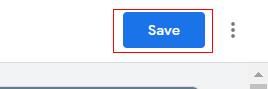
Step 6: Click on ‘Save’.
Since our Data Layer variable is configured, we can proceed with implementing ecommerce events. We will be measuring the standard ecommerce events.
The below section will provide you details of DataLayer code, GTM tag configuration and trigger condition.
1. Product/item list views/impressions
This event will measure product impressions. We need to fire this tag on the pages where a list of products is displayed, generally on the home page, category pages, etc.
DataLayer configuration:
To measure item list views/impressions, we need to push a list of products and their attributes to the data layer and pass a ‘view_item_list’ event along with that data.
// Measure product views / impressions
dataLayer.push({
‘event’: ‘view_item_list’,
‘ecommerce’: {
‘items’: [
{
‘item_name’: ‘Sample Product 1’, // Product Name- Type: String
‘item_id’: ‘123456’, // Product ID/SKU- Type: String
‘price’: ‘35.25’, // Product price – Type: numeric
‘item_brand’: ‘Your Brand Name’, //Product brand – Type: string
‘item_category’: ‘Category Name’, // Product category Main – Type: string
‘item_category_2’: ‘Category level1’, // Product category (Mens, Kids) – Type: string
‘item_category_3’: ‘Category level2’, // Product category (Shirts, Shoes) – Type: string
‘item_category_4’: ‘Category level3’, // Product category (T-shirt, Sport Shoes) – Type: string
‘item_variant’: ‘Variant’, // Variant of the product like color, size etc – Type: string
‘item_list_name’: ‘Search Results’, // Product List Name – Type: string
‘item_list_id’: ‘SR12’, // Product List ID – Type: string
‘index’: 1, // Product List Position – Type: Numeric
‘quantity’: ‘1’ // Product quantity – Type: numeric
}]
}
});
Google tag configuration:
Once the above code is pushed to the DataLayer, the next step is to configure your tag. Follow the below steps to configure.
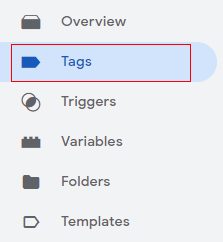
Step 1: Log in to your Google Tag Manager console and click on ‘Tags’ in the left-hand side menu.
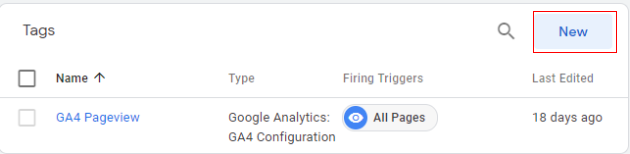
Step 2: Click on ‘New’ to create a new scroll event tag for the GA4 property.
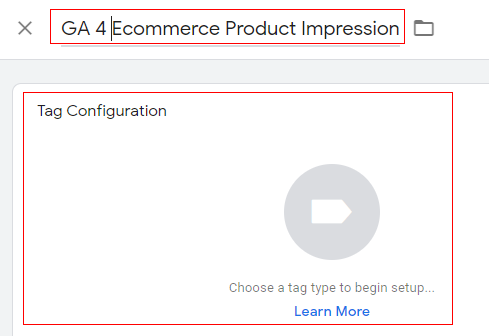
Step 3: Give a proper name to your tag and click on ‘Tag Configuration’.
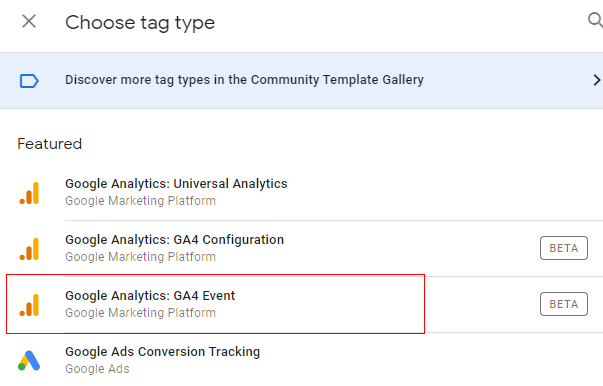
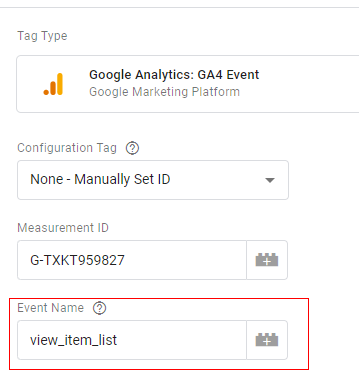
Step 4: An overlay will appear at the right-hand side with a list of tag templates. Select ‘Google Analytics: GA4 Event’.
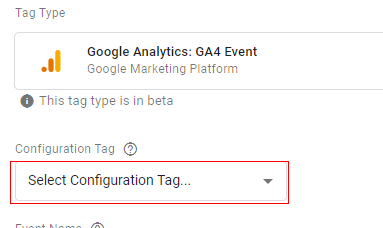
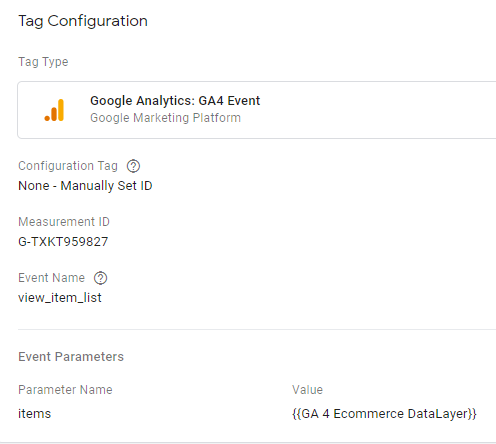
Step 5: Tag configuration window will open like below. Click on ‘Select Configuration Tag’.
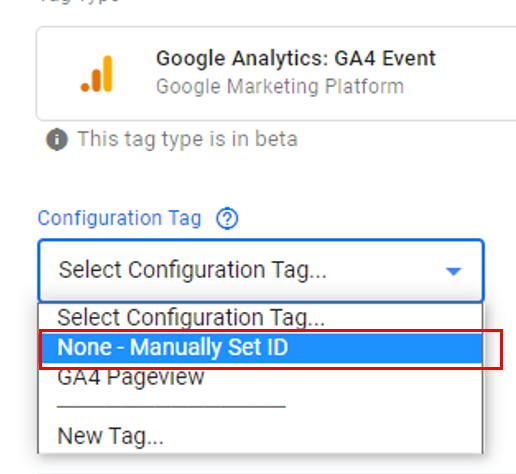
Step 6: A drop-down menu will appear. You can either select your pageview tag or ‘None- Manually Set ID’ from the drop-down. In our case, we will select ‘None- Manually Set ID’.
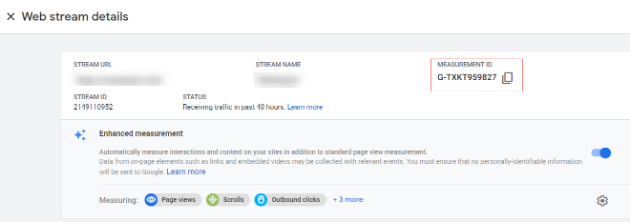
Step 7: The next step is to enter the GA measurement ID in the input box.
You can find your measurement ID in the admin section under ‘Data Streams’.

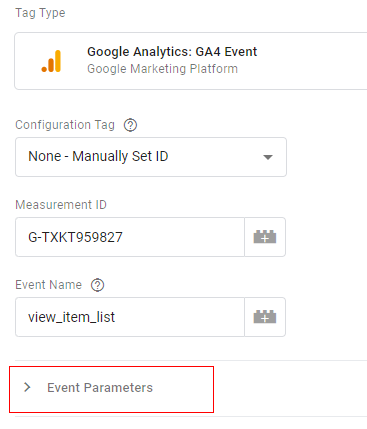
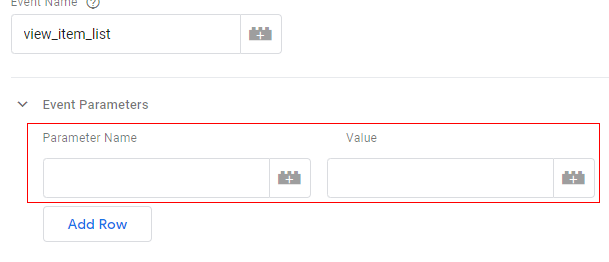
Step 8: Specify the name of the event. Event name you provide here will appear in you GA4 analytics reporting. Now give an event name as ‘view_item_list’.
Step 9: Click on the ‘Event Parameters’ drop-down menu:
Step 10: Click on the ‘Add Row’ button:
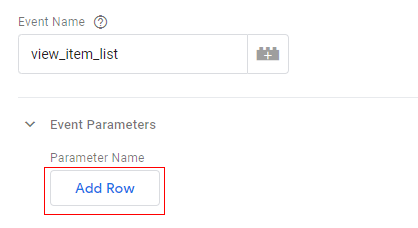
You should now see the two new text boxes: ‘Parameter Name’ and ‘Value’.
Step 11: Type ‘items’ in the ‘Parameter Name’ text box.
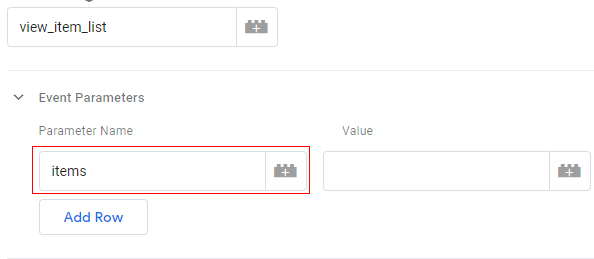
Step 12: Click on the ‘+’ button under the ‘Value’ text box:
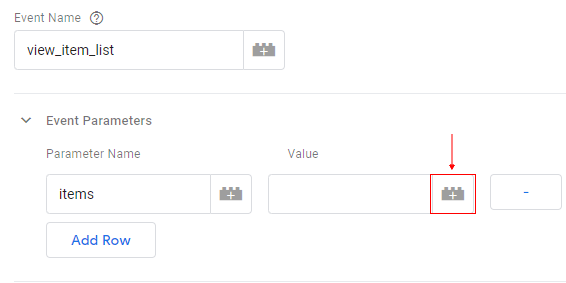
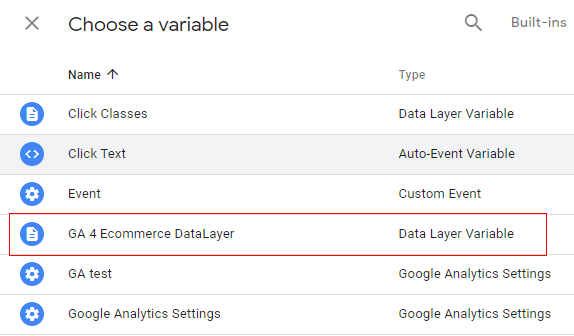
Step 13: An overlay will appear like below. Select ‘GA 4 Ecommerce DataLayer’ variable. This the same variable that we created earlier.
Step 14: Your tag configuration will appear like below.
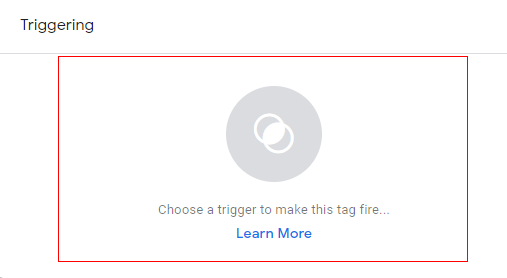
It’s done! Now let’s set up the trigger configuration.
Trigger Configuration:
Step 15: Click anywhere under ‘Triggering’.
Step 16: An overlay will appear like below. Click on the ‘+’ icon to add a new trigger.
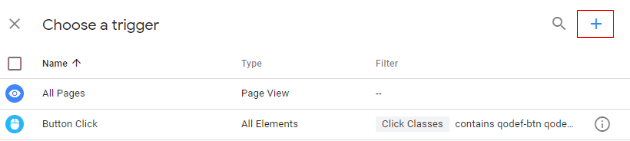
Step 17: Give a proper name to your trigger and click anywhere in ‘Trigger Configuration’.
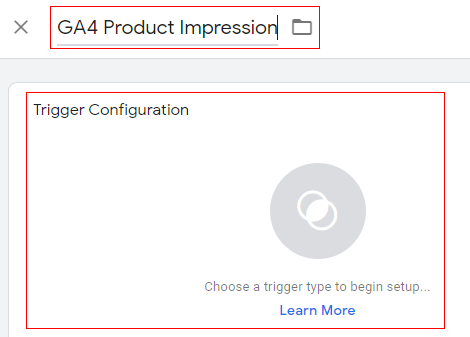
Step 18: An overlay will appear like below. Select ‘Custom Event’ from the list.
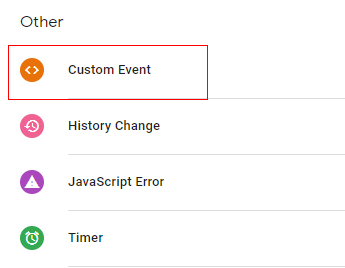
Step 19: ‘Trigger Configuration’ will open. In the input box, we need to provide the event name. In this event, it is ‘view_item_list’ since we are measuring product impressions. Type ‘view_item_list’ In the event name.
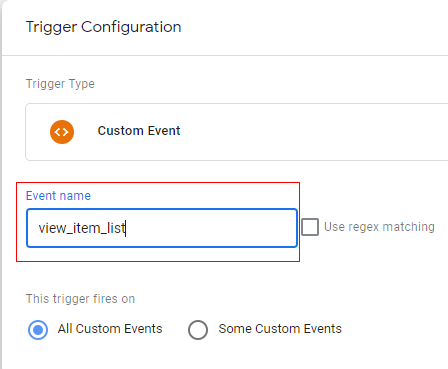
Step 20: Click on ‘Save’.

Your complete tag will look like below.
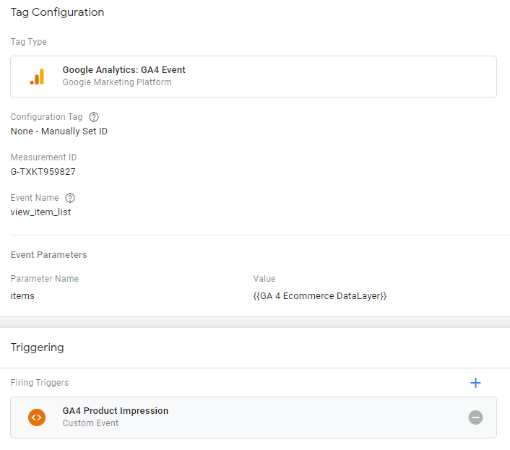
Congratulations!!! You have successfully created your first ecommerce event for your GA4 property. Now let’s do this for the remaining ecommerce events.
Since I already showed you the step-by-step method to create it in the above event, for the other events I will now only show you the DataLayer code, and final tag configuration and trigger configuration.
2. Product/item list clicks
DataLayer configuration:
To measure product clicks, we need to push the product and its attributes to the data layer and pass a ‘select_item’ event along with that data.
// Measure product Clicks
dataLayer.push({
‘event’: ‘select_item’,
‘ecommerce’: {
‘items’: [
{
‘item_name’: ‘Sample Product 1’, // Product Name- Type: String
‘item_id’: ‘123456’, // Product ID/SKU- Type: String
‘price’: ‘35.25’, // Product price – Type: numeric
‘item_brand’: ‘Your Brand Name’, //Product brand – Type: string
‘item_category’: ‘Category Name’, // Product category Main – Type: string
‘item_category_2’: ‘Category level1’, // Product category (Mens, Kids) – Type: string
‘item_category_3’: ‘Category level2’, // Product category (Shirts, Shoes) – Type: string
‘item_category_4’: ‘Category level3’, // Product category (T-shirt, Sport Shoes) – Type: string
‘item_variant’: ‘Variant’, // Variant of the product like color, size etc – Type: string
‘item_list_name’: ‘Search Results’, // Product List Name – Type: string
‘item_list_id’: ‘SR12’, // Product List ID – Type: string
‘index’: 1, // Product List Position – Type: Numeric
‘quantity’: ‘1’ // Product quantity – Type: numeric
}]
}
});
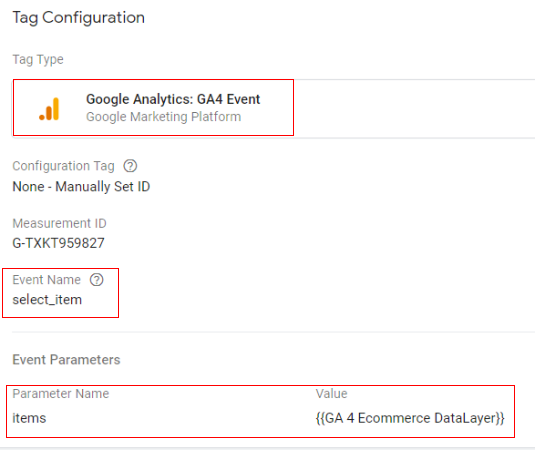
Google tag configuration:
Once the above code is pushed to the DataLayer, you can configure your Google Tag Manager tag like below.
- Tag type: GA4 Event
- Event name: select_item
- Event parameter (name – value): ‘items’ – {{Ecommerce Items}}
- Variable type: data layer variable – ‘ecommerce.items’
Trigger configuration:
You can create a trigger with below configuration
- Trigger type: Custom event
- Trigger condition: event equals ‘select_item’

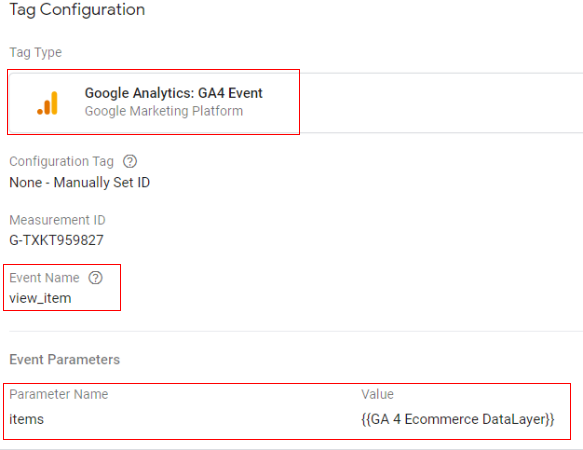
3. Product/item detail views
To measure product views, we need to push the product and its attributes to the data layer and pass a ‘view_item’ event along with that data.
// Measure Product Detail View
dataLayer.push({
‘event’: ‘view_item’,
‘ecommerce’: {
‘items’: [
{
‘item_name’: ‘Sample Product 1’, // Product Name- Type: String
‘item_id’: ‘123456’, // Product ID/SKU- Type: String
‘price’: ‘35.25’, // Product price – Type: numeric
‘item_brand’: ‘Your Brand Name’, //Product brand – Type: string
‘item_category’: ‘Category Name’, // Product category Main – Type: string
‘item_category_2’: ‘Category level1’, // Product category (Mens, Kids) – Type: string
‘item_category_3’: ‘Category level2’, // Product category (Shirts, Shoes) – Type: string
‘item_category_4’: ‘Category level3’, // Product category (T-shirt, Sport Shoes) – Type: string
‘item_variant’: ‘Variant’, // Variant of the product like color, size etc – Type: string
‘item_list_name’: ‘Search Results’, // Product List Name – Type: string
‘item_list_id’: ‘SR12’, // Product List ID – Type: string
‘index’: 1, // Product List Position – Type: Numeric
‘quantity’: ‘1’ // Product quantity – Type: numeric
}]
}
});
Google tag configuration:
Once the above code is pushed to the DataLayer, you can configure your Google Tag Manager tag like below.
- Tag type: GA4 Event
- Event name: view_item
- Event parameter (name – value): ‘items’ – {{Ecommerce Items}}
- Variable type: data layer variable – ‘ecommerce.items’
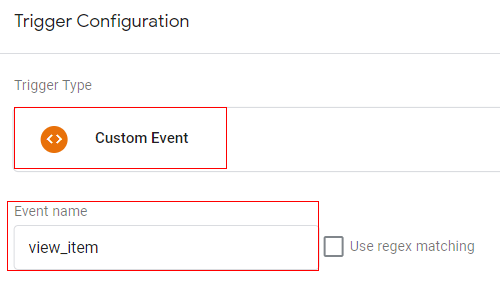
Trigger configuration:
You can create a trigger with below configuration
- Trigger type: Custom event
- Trigger condition: event equals ‘view_item
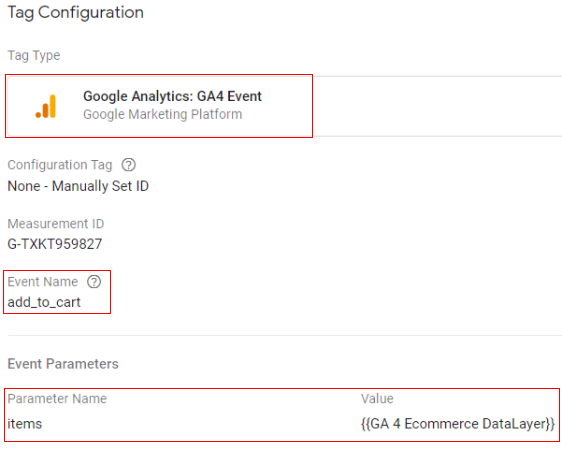
4. Add to cart
To measure add to cart, we need to push the product and its attributes to the data layer and pass a ‘view_item’ event along with that data.
// Measure Add to Cart
dataLayer.push({
‘event’: ‘ add_to_cart’,
‘ecommerce’: {
‘items’: [
{
‘item_name’: ‘Sample Product 1’, // Product Name- Type: String
‘item_id’: ‘123456’, // Product ID/SKU- Type: String
‘price’: ‘35.25’, // Product price – Type: numeric
‘item_brand’: ‘Your Brand Name’, //Product brand – Type: string
‘item_category’: ‘Category Name’, // Product category Main – Type: string
‘item_category_2’: ‘Category level1’, // Product category (Mens, Kids) – Type: string
‘item_category_3’: ‘Category level2’, // Product category (Shirts, Shoes) – Type: string
‘item_category_4’: ‘Category level3’, // Product category (T-shirt, Sport Shoes) – Type: string
‘item_variant’: ‘Variant’, // Variant of the product like color, size etc – Type: string
‘item_list_name’: ‘Search Results’, // Product List Name – Type: string
‘item_list_id’: ‘SR12’, // Product List ID – Type: string
‘index’: 1, // Product List Position – Type: Numeric
‘quantity’: ‘1’ // Product quantity – Type: numeric
}]
}
});
Google tag configuration:
Once the above code is pushed to the DataLayer, you can configure your Google Tag Manager tag like below.
- Tag type: GA4 event
- Event name: add_to_cart
- Event parameter (name – value): ‘items’ – {{Ecommerce Items}}
- Variable type: data layer variable – ‘ecommerce.items’
Trigger configuration:
You can create a trigger with below configuration
- Trigger type: Custom event
- Trigger condition: event equals ‘add_to_cart’

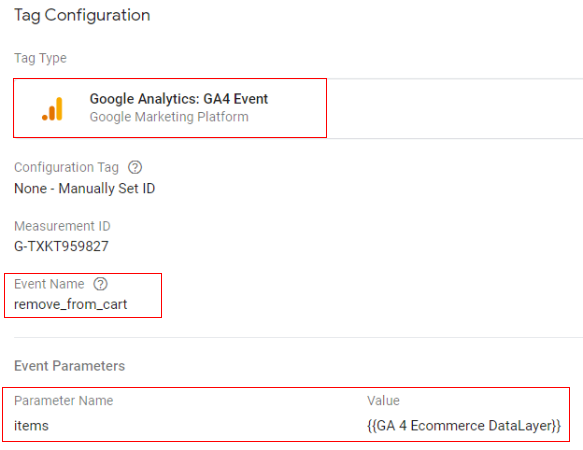
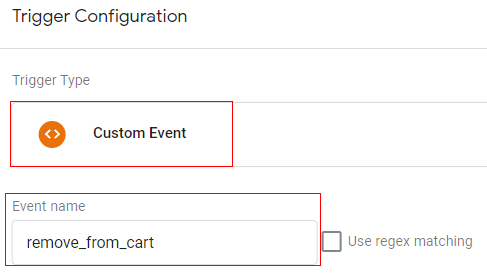
5. Remove from cart
To measure remove from cart, we need to push a product and its attributes to the data layer and pass a ‘remove_from_cart’ event along with that data.
// Measure Remove From Cart
dataLayer.push({
‘event’: ‘ remove_from_cart’,
‘ecommerce’: {
‘items’: [
{
‘item_name’: ‘Sample Product 1’, // Product Name- Type: String
‘item_id’: ‘123456’, // Product ID/SKU- Type: String
‘price’: ‘35.25’, // Product price – Type: numeric
‘item_brand’: ‘Your Brand Name’, //Product brand – Type: string
‘item_category’: ‘Category Name’, // Product category Main – Type: string
‘item_category_2’: ‘Category level1’, // Product category (Mens, Kids) – Type: string
‘item_category_3’: ‘Category level2’, // Product category (Shirts, Shoes) – Type: string
‘item_category_4’: ‘Category level3’, // Product category (T-shirt, Sport Shoes) – Type: string
‘item_variant’: ‘Variant’, // Variant of the product like color, size etc – Type: string
‘item_list_name’: ‘Search Results’, // Product List Name – Type: string
‘item_list_id’: ‘SR12’, // Product List ID – Type: string
‘index’: 1, // Product List Position – Type: Numeric
‘quantity’: ‘1’ // Product quantity – Type: numeric
}]
}
});
Google tag configuration:
Once the above code is pushed to the DataLayer, you can configure your Google Tag Manager tag like below.
- Tag type: GA4 event
- Event name: remove_from_cart
- Event parameter (name – value): ‘items’ – {{Ecommerce Items}}
- Variable type: data layer variable – ‘ecommerce.items’
Trigger configuration:
You can create a trigger with below configuration.
- Trigger type: Custom event
- Trigger condition: event equals ‘remove_from_cart’
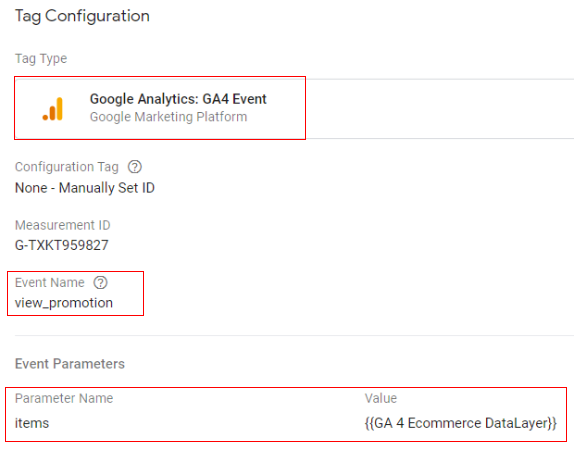
6. Promotion views/impressions
You can measure both impressions and clicks on internal site promotions. These promotions include banners displayed on the site or an offer for free shipping.
To measure promotion view details, we need to push the product and its attributes to the data layer and pass a ‘view_promotion’ event along with that data.
// Measure promotion views/impressions
dataLayer.push({
‘event’: ‘view_promotion’,
‘ecommerce’: {
‘items’: [
{
‘item_name’: ‘Sample Product 1’, // Product Name- Type: String
‘item_id’: ‘123456’, // Product ID/SKU- Type: String
‘price’: ‘35.25’, // Product price – Type: numeric
‘item_brand’: ‘Your Brand Name’, //Product brand – Type: string
‘item_category’: ‘Category Name’, // Product category Main – Type: string
‘item_category_2’: ‘Category level1’, // Product category (Mens, Kids) – Type: string
‘item_category_3’: ‘Category level2’, // Product category (Shirts, Shoes) – Type: string
‘item_category_4’: ‘Category level3’, // Product category (T-shirt, Sport Shoes) – Type: string
‘item_variant’: ‘Variant’, // Variant of the product like color, size etc – Type: string
‘promotion_id’: ‘abc123’, // Promotion Campaign ID – Type: Srting
‘promotion_name’: ‘summer_promo’, // Promotion Campaign Name – Type: Srting
‘creative_name’: ‘instore_suummer’, // Promotion Creative Name – Type: Srting
‘creative_slot’: ‘1’, // Promotion Creative Slot – Type: Numeric
‘location_id’: ‘hero_banner’, // Promotion Location – Type: Srting
‘index’: 1, // Product List Position – Type: Numeric
‘quantity’: ‘1’ // Product quantity – Type: numeric
}]
}
});
Google tag configuration:
Once the above code is pushed to the DataLayer, you can configure your Google Tag Manager tag like below.
- Tag type: GA4 event
- Event name: view_promotion
- Event parameter (name – value): ‘items’ – {{Ecommerce Items}}
- Variable type: data layer variable – ‘ecommerce.items’
Trigger configuration:
You can create a trigger with below configuration
- Trigger type: Custom event
- Trigger condition: event equals ‘view_promotion’
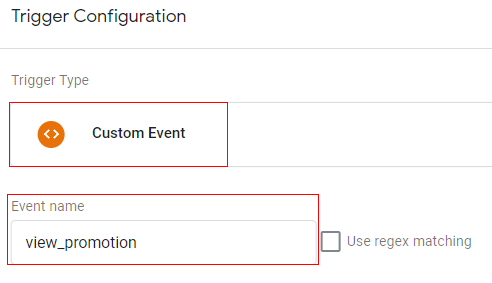
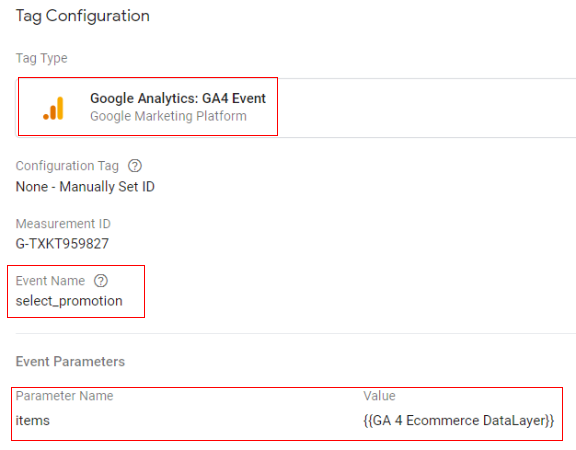
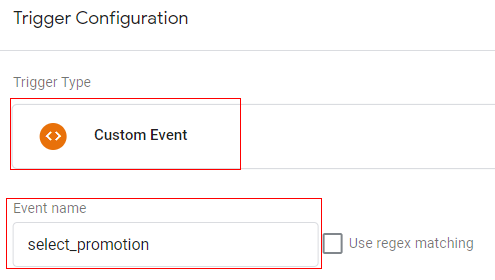
7. Promotion clicks
To measure promotion clicks details, we need to push the product and its attributes to the data layer and pass a ‘select_promotion’ event along with that data.
// Measure promotion Clicks
dataLayer.push({
‘event’: ‘ select_promotion ‘,
‘ecommerce’: {
‘items’: [
{
‘item_name’: ‘Sample Product 1’, // Product Name- Type: String
‘item_id’: ‘123456’, // Product ID/SKU- Type: String
‘price’: ‘35.25’, // Product price – Type: numeric
‘item_brand’: ‘Your Brand Name’, //Product brand – Type: string
‘item_category’: ‘Category Name’, // Product category Main – Type: string
‘item_category_2’: ‘Category level1’, // Product category (Mens, Kids) – Type: string
‘item_category_3’: ‘Category level2’, // Product category (Shirts, Shoes) – Type: string
‘item_category_4’: ‘Category level3’, // Product category (T-shirt, Sport Shoes) – Type: string
‘item_variant’: ‘Variant’, // Variant of the product like color, size etc – Type: string
‘promotion_id’: ‘abc123’, // Promotion Campaign ID – Type: Srting
‘promotion_name’: ‘summer_promo’, // Promotion Campaign Name – Type: Srting
‘creative_name’: ‘instore_suummer’, // Promotion Creative Name – Type: Srting
‘creative_slot’: ‘1’, // Promotion Creative Slot – Type: Numeric
‘location_id’: ‘hero_banner’, // Promotion Location – Type: Srting
‘index’: 1, // Product List Position – Type: Numeric
‘quantity’: ‘1’ // Product quantity – Type: numeric
}]
}
});
Google tag configuration:
Once the above code is pushed to the DataLayer, you can configure your Google Tag Manager tag like below.
- Tag type: GA4 Event
- Event name: select_promotion
- Event parameter (name – value): ‘items’ – {{Ecommerce Items}}
- Variable type: data layer variable – ‘ecommerce.items’
Trigger configuration:
You can create a trigger with below configuration
- Trigger type: Custom event
- Trigger condition: event equals ‘select_promotion’
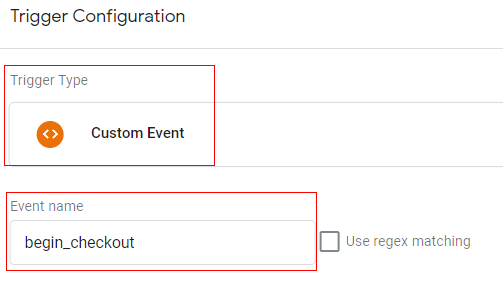
8. Checkouts
To measure checkout activity details, we need to push a product and its attributes to the data layer and pass a ‘begin_checkout’ event along with that data.
// Measure a Checkout
dataLayer.push({
‘event’: ‘ begin_checkout’,
‘ecommerce’: {
‘items’: [
{
‘item_name’: ‘Sample Product 1’, // Product Name- Type: String
‘item_id’: ‘123456’, // Product ID/SKU- Type: String
‘price’: ‘35.25’, // Product price – Type: numeric
‘item_brand’: ‘Your Brand Name’, //Product brand – Type: string
‘item_category’: ‘Category Name’, // Product category Main – Type: string
‘item_category_2’: ‘Category level1’, // Product category (Mens, Kids) – Type: string
‘item_category_3’: ‘Category level2’, // Product category (Shirts, Shoes) – Type: string
‘item_category_4’: ‘Category level3’, // Product category (T-shirt, Sport Shoes) – Type: string
‘item_variant’: ‘Variant’, // Variant of the product like color, size etc – Type: string
‘index’: 1, // Product List Position – Type: Numeric
‘quantity’: ‘1’ // Product quantity – Type: numeric
}]
}
});
Google tag configuration:
Once the above code is pushed to the DataLayer, you can configure your Google Tag Manager tag like below
- Tag type: GA4 event
- Event name: begin_checkout
- Event parameter (name – value): ‘items’ – {{Ecommerce Items}}
- Variable type: data layer variable – ‘ecommerce.items’

Trigger configuration:
You can create a trigger with below configuration.
- Trigger type: Custom event
- Trigger condition: event equals ‘begin_checkout’
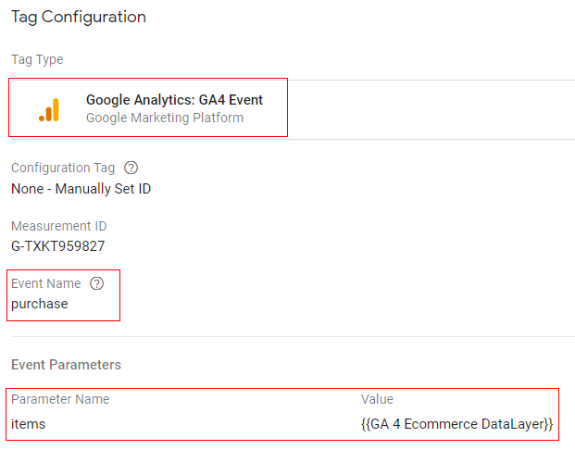
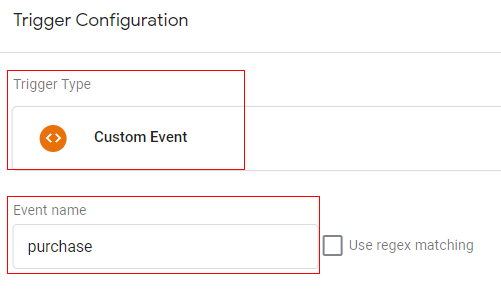
9. Purchases
To measure purchases, we need to push transactions, products and their attributes to the data layer and pass a ‘purchase’ event along with that data on thank you page.
// Measure purchases
dataLayer.push({
‘event’: ‘purchase’,
‘ecommerce’: {
‘purchase’: {
‘transaction_id’: ‘T12345’, // Transaction ID- Type: String
‘affiliation’: ‘Online Store’, // Affliation – Type: String
‘value’: ‘35.25’, // Product Price- Type: Numeric
‘tax’: ‘4.90’, // Taxes If applicable- Type: Numeric
‘shipping’: ‘5.99’, // Shipping Charges- Type: Numeric
‘currency’: ‘EUR’, // Currency- Type: Numeric
‘coupon’: ‘SUMMER_SALE’, // Coupan Code if applicable- Type: String
‘items’: [
{
‘item_name’: ‘Sample Product 1’, // Product Name- Type: String
‘item_id’: ‘123456’, // Product ID/SKU- Type: String
‘price’: ‘35.25’, // Product price – Type: numeric
‘item_brand’: ‘Your Brand Name’, //Product brand – Type: string
‘item_category’: ‘Category Name’, // Product category Main – Type: string
‘item_category_2’: ‘Category level1’, // Product category (Mens, Kids) – Type: string
‘item_category_3’: ‘Category level2’, // Product category (Shirts, Shoes) – Type: string
‘item_category_4’: ‘Category level3’, // Product category (T-shirt, Sport Shoes) – Type: string
‘item_variant’: ‘Variant’, // Variant of the product like color, size etc – Type: string
‘quantity’: ‘1’ // Product quantity – Type: numeric
}]
}
});
Google tag configuration:
Once the above code is pushed to the DataLayer, you can configure your Google Tag Manager tag like below.
- Tag type: GA4 event
- Event name: purchase
- Event parameter (name – value): ‘items’ – {{Ecommerce Items}}
- Variable type: data layer variable – ‘ecommerce.items’
Trigger configuration:
You can create a trigger with below configuration.
- Trigger type: Custom event
- Trigger condition: event equals ‘purchase’
10. Refunds
To measure refunds, we need to push transaction details to the data layer and pass a ‘refund’ event along with that data onto the thank you page.
// Measure Refunds
dataLayer.push({
‘event’: ‘refund’,
‘ecommerce’: {
‘transaction_id’: ‘T12345’, // Transaction ID- Type: String
}
});
Google tag configuration:
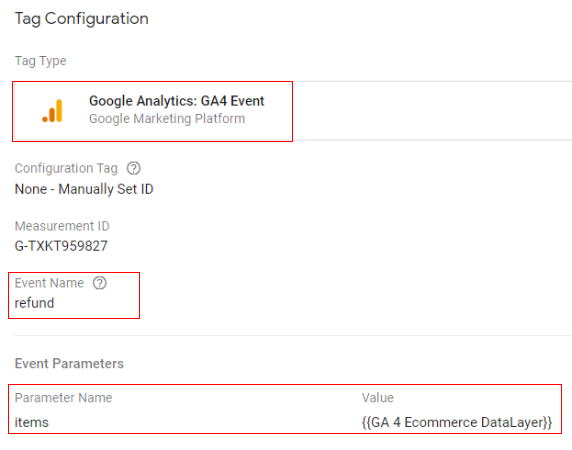
Once the above code is pushed to the DataLayer, you can configure your Google Tag Manager tag like below.
- Tag type: GA4 Event
- Event name: refund
- Event parameter (name – value): ‘items’ – {{Ecommerce Items}}
- Variable type: data layer variable – ‘ecommerce.items’
Trigger configuration:
You can create trigger with below configuration
- Trigger type: Custom event
- Trigger condition: event equals ‘refund’

In the case that you want to measure a partial refund, you can also pass a list of products with their attributes as below.
// Measure Refunds
dataLayer.push({
‘event’: ‘refund’,
‘ecommerce’: {
‘transaction_id’: ‘T12345’, // Transaction ID- Type: String
‘items’: [
{
‘item_name’: ‘Sample Product 1’, // Product Name- Type: String
‘item_id’: ‘123456’, // Product ID/SKU- Type: String
‘price’: ‘35.25’, // Product price – Type: numeric
‘item_brand’: ‘Your Brand Name’, //Product brand – Type: string
‘item_category’: ‘Category Name’, // Product category Main – Type: string
‘item_category_2’: ‘Category level1’, // Product category (Mens, Kids) – Type: string
‘item_category_3’: ‘Category level2’, // Product category (Shirts, Shoes) – Type: string
‘item_category_4’: ‘Category level3’, // Product category (T-shirt, Sport Shoes) – Type: string
‘item_variant’: ‘Variant’, // Variant of the product like color, size etc – Type: string
‘quantity’: ‘1’ // Product quantity – Type: numeric
}]
}
});
The rest of the Google Tag Manager configuration and trigger configuration will remain the same.
So, that is how you can set up ecommerce tracking in Google Analytics 4.
Ecommerce reporting in GA4
Now since you have completed the ecommerce set up for your GA4 property, you can wait for some time to generate the data and then proceed with reporting interface.
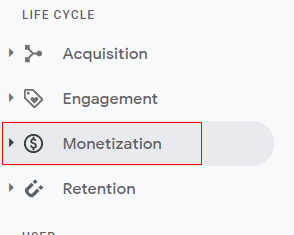
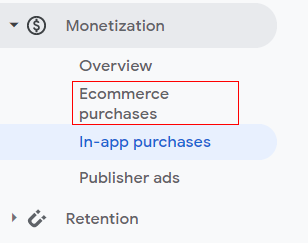
To view ecommerce reports for your GA4 property you can click on ‘Monetization’ in the reporting menu.
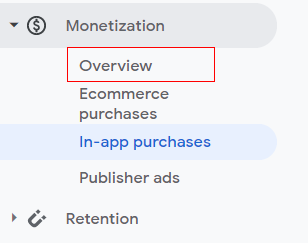
Then click on ‘Overview’.
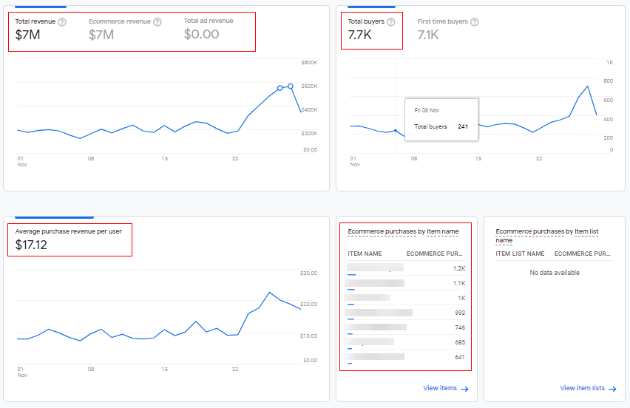
You will get to see below trends and tables providing details like ‘Total Revenue’, ‘Total Buyers’ and ‘Avg. purchase revenue per user’.
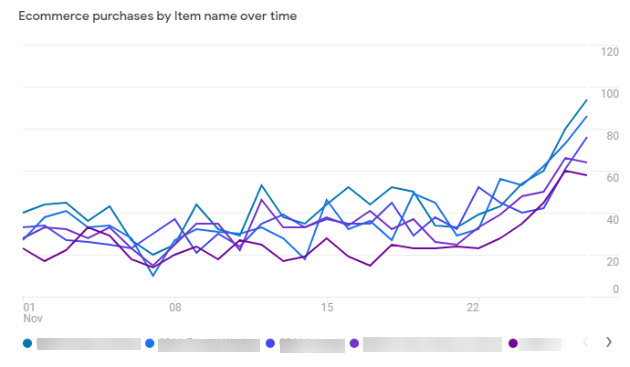
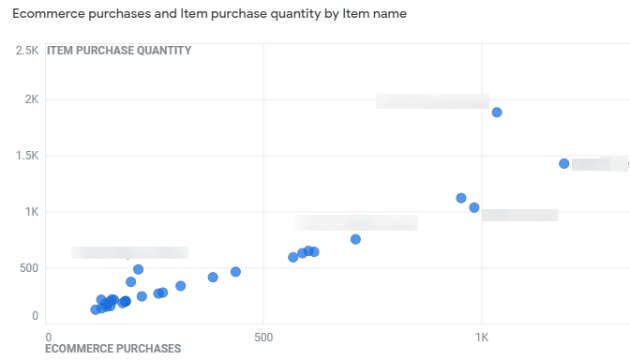
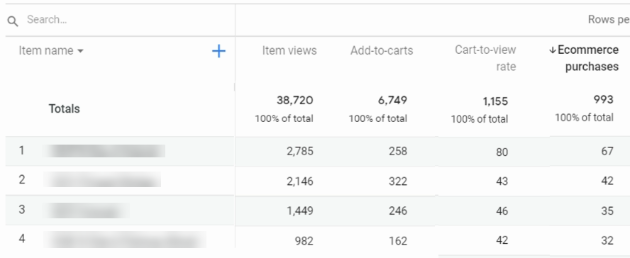
If you want more a detailed report you can click on ‘Ecommerce Purchases’ in the reporting menu.
You will get a detailed report like below.
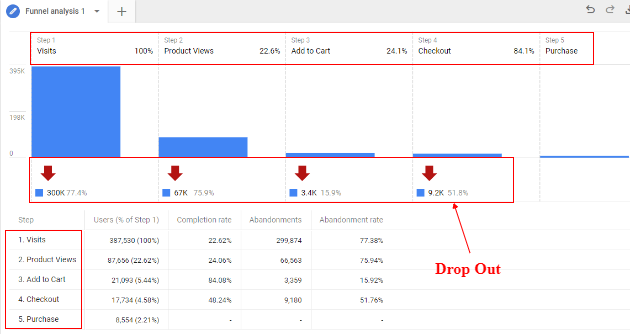
You can also check the funnel report in the ‘Analysis’ tab by defining the funnel steps.
Note: You need to create a funnel in the analysis hub. If you are new and don’t know how to use exploration reports and funnel reports, you can check this to understand more: How to Use the Exploration Report
This how you can set up ecommerce tracking in a Google Analytics 4 property.