Follow the steps below to set up ecommerce tracking:
Step-1: Sign up for a Google Analytics account (if you already don’t have one).
Step-2: Once you have created your Google Analytics account, navigate to https://analytics.google.com/analytics/web/
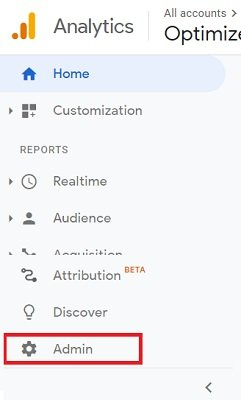
Step-3: Click on the ‘Admin’ link at the bottom left-hand
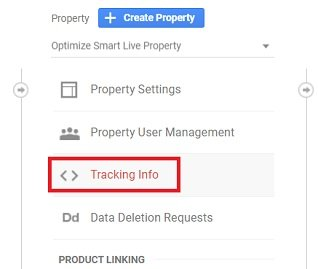
Step-4: Click on the ‘Tracking Info’ drop-down menu under the ‘Property Column’:
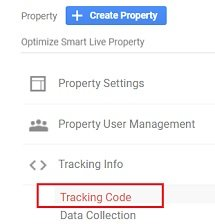
Step-5: Click on the ‘Tracking Code’ link:
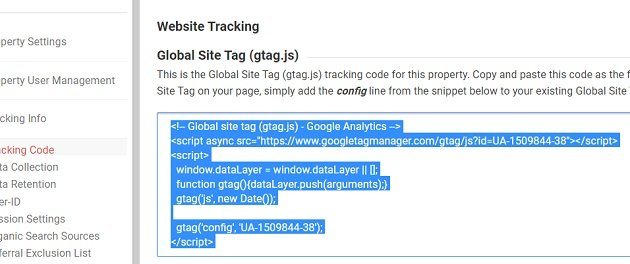
Copy the Google Analytics tracking code (the Global Site Tag (gtag.js) tracking code) from the box under the section ‘Website Tracking‘:
Step-7: Paste the Google Analytics tracking code on all the pages of your website (in the head section <head>…</head>). If you use a template file, paste the code in the header template file like header.php.
Step-8: Navigate to your website and then navigate to Real Time > Overview report in your Google Analytics account:
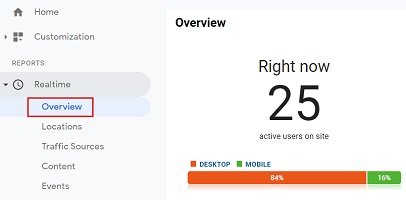
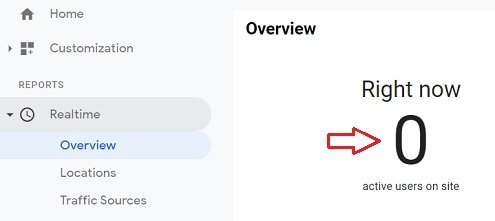
If you see the number of active users in your real time overview report, it means Google Analytics (GA) has been successfully installed on your website. However, if you see 0 number of active users, then it means GA tracking is not correctly installed:
Step-9: Navigate to Conversions > Ecommerce > Overview report:
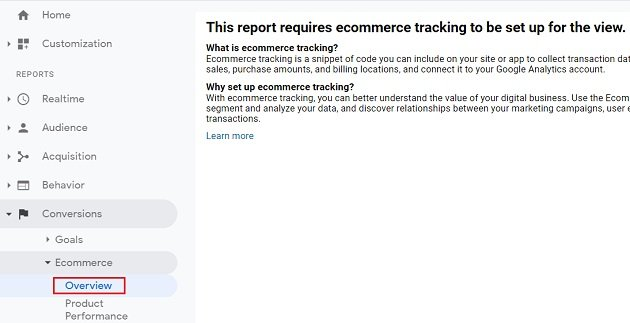
Whenever you navigate to one of the ecommerce reports of a GA view for which ecommerce tracking is not enabled, you see the message “This report requires ecommerce tracking to be set up for the view“. You would need to enable Ecommerce reporting for each view in which you want to see the ecommerce data.
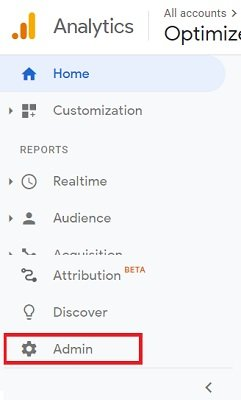
Step-10: Click on the ‘Admin’ link at the bottom left-hand side:
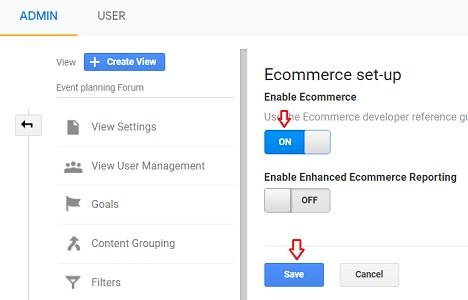
Step-11: Click on ‘Ecommerce Settings‘ under the view column:

Step-12: Switch on the ‘Enable Ecommerce’ toggle button and then click on the ‘Save’ button:
You have now successfully enabled Ecommerce reporting for your view. If you now navigate back to Conversions > Ecommerce > Overview report, you will no longer see the message “This report requires ecommerce tracking to be set up for the view“:

However, you still won’t see the ecommerce data because you have not installed the ecommerce tracking code on your website.
Just because you have enabled ecommerce tracking reporting in GA does not mean that you have also set up ecommerce tracking. All you have done so far is allowed your GA view to collect and report on ecommerce data.
Step-13: Integrate your shopping cart (like Shopify) with Google Analytics. Check the help documentation provided by your shopping cart for more details. Following is the help documentation for the most popular shopping carts:
- Setting up Google Analytics on Shopify Store
- Setting up Google Analytics on WooCommerce Store
- Setting up Google Analytics on Magento Store
- Setting up Google Analytics on BigCommerce Store
- Setting up Google Analytics on Drupal Store
- Setting up Google Analytics on Volusion Store
- Setting up Google Analytics on 3dCart Store
Note: Shopping cart vendors generally won’t help you set up ecommerce tracking for your website. You would need to hire a developer (who has experience with the Google Analytics Development environment) to install ecommerce tracking for you.
Step-14: Hire a Google Analytics developer to add the ecommerce tracking code (provided by Google) on the order confirmation page (generally the ‘thank you’ page).
Here is how the ecommerce tracking code looks like (if you are using analytics.js library):
ga(‘require’, ‘ecommerce’, ‘ecommerce.js’);
ga(‘ecommerce:addTransaction’, {
‘id’: ‘1234’, // Transaction ID. Required.
‘affiliation’: ‘skinny jeans’, // store name.
‘revenue’: ‘28.8’, // total revenue.
‘shipping’: ‘10.00’, // Shipping.
‘tax’: ‘1.89’ // Tax.
});
ga(‘ecommerce:addItem’, {
‘id’: ‘1234’, // Transaction ID. Required. Same as in the transaction data.
‘name’: ‘OKEJeans’, // Product name. Required.
‘sku’: ‘SKJ49’, // Product SKU.
‘category’: ‘Men Jeans’, // Product Category or variation.
‘price’: ‘76.65’, // Product price.
‘quantity’: ‘1’ // Product Quantity.
});
ga(‘ecommerce:send’);
This ecommerce tracking code is usually placed after the following line of code ga(‘create’, ‘UA-123456-12’, ‘auto’); and just before the following code ga(‘send’, ‘pageview’);.in the Google Analytics Tracking Code:
So the whole set-up may look like the one below:
<script>
(function(i,s,o,g,r,a,m){i[‘GoogleAnalyticsObject’]=r;i[r]=i[r]||function(){
(i[r].q=i[r].q||[]).push(arguments)},i[r].l=1*new Date();a=s.createElement(o),
m=s.getElementsByTagName(o)[0];a.async=1;a.src=g;m.parentNode.insertBefore(a,m)
})(window,document,’script’,’//www.google-analytics.com/analytics.js’,’ga’);
ga(‘create’, ‘UA-123456-12’, ‘auto’);
ga(‘require’, ‘ecommerce’, ‘ecommerce.js’);
ga(‘ecommerce:addTransaction’, {
‘id’: ‘1234’, // Transaction ID. Required.
‘affiliation’: ‘skinny jeans’, // store name.
‘revenue’: ‘28.8’, // total revenue.
‘shipping’: ‘10.00’, // Shipping.
‘tax’: ‘1.89’ // Tax.
});
ga(‘ecommerce:addItem’, {
‘id’: ‘1234’, // Transaction ID. Required. Same as in the transaction data.
‘name’: ‘OKEJeans’, // Product name. Required.
‘sku’: ‘SKJ49’, // Product SKU.
‘category’: ‘Men Jeans’, // Product Category or variation.
‘price’: ‘76.65’, // Product price.
‘quantity’: ‘1’ // Product Quantity.
});
ga(‘ecommerce:send’);
ga(‘send’, ‘pageview’);
</script>
Here the code in bold letters is the ecommerce tracking code. The rest is the Google Analytics tracking code.
However, this code is still not complete. To retrieve ecommerce data from your shopping cart, you need to add a server-side script to the code above.
Step-15: Ask your developer to add a server-side script (like PHP, ASP, etc.) to your commerce tracking code. Your server-side script should loop through all the products purchased in a transaction and send product data for each of them to the Google Analytics server.
So your actual ecommerce tracking code will look very different once the server-side script is added to it.
For example, here is what your ecommerce tracking may look like if you used PHP:
<script>
(function(i,s,o,g,r,a,m){i[‘GoogleAnalyticsObject’]=r;i[r]=i[r]||function(){
(i[r].q=i[r].q||[]).push(arguments)},i[r].l=1*new Date();a=s.createElement(o),
m=s.getElementsByTagName(o)[0];a.async=1;a.src=g;m.parentNode.insertBefore(a,m)
})(window,document,’script’,’//www.google-analytics.com/analytics.js’,’ga’);
ga(‘create’, ‘UA-123456-12’, ‘auto’);
ga(‘require’, ‘ecommerce’, ‘ecommerce.js’);
<?php
If($_SERVER[SCRIPT_NAME]==/thank-you.php”) {
?>
ga(‘ecommerce:addTransaction’, {
‘id’: ‘<? = $orders[‘order_id’]?>’,
‘affiliation’: ‘<? = $orders[‘store_name’]?>’,
‘revenue’: ‘<? = $orders[‘revenue’]?>’,
‘shipping’: ‘<? = $orders[‘shipping’]?>’,
‘tax’: ‘<? = $orders[‘tax’]?>’
});
<?php
for ($i=0;$n=sizeof($products_array);$i<$n;$i++) {
?>
ga(‘ecommerce:addItem’, {
‘id’: ‘<? = $orders[‘order_id’] ?>’,
‘name’: ‘<? =$products_array[$i][‘name’] ?>’,
‘sku’: ‘<? =$products_array[$i][‘sku’] ?>’,
‘category’: ‘<? =$products_array[$i][‘category’] ?>’,
‘price’: ‘<? =$products_array[$i][‘price’] ?>’,
‘quantity’: ‘<? =$products_array[$i][‘quantity’] ?>’
});
}
?>
ga(‘ecommerce:send’);
ga(‘send’, ‘pageview’);
</script>
Note(1): Do not use this ecommerce tracking code on your website. It is just an example and is not even a complete code.
Note(2): The actual ecommerce tracking code will vary depending upon your CMS and shopping cart.
Step-16: Set up a funnel for your checkout process in Google Analytics. To do this, first determine all of the web pages which make up your shopping cart funnel (including the URL of the order confirmation page).
Step-17: Place a test transaction and see whether you are getting the correct ecommerce data in GA reports.
You can learn how shopping carts and payment gateways work and interact with Google Analytics in Understanding Shopping Carts for analytics and Conversion Optimization