Step-1: Navigate to the admin section of your reporting view in your GA3 property.
Step-2: Click on the ‘Upgrade to GA4‘ link under the ‘Property’ column:

Step-3: Click on the ‘Get Started‘ button under the section ‘I need to create a new Google Analytics 4 property‘:

Step-4: Click on the ‘Create Property‘ button:

Google Analytics will now automatically create new GA4 property. This new property will open up in a different browser tab and you will be automatically redirected to it.
Your existing GA property will remain intact. So now you have access to at least two GA properties. One is your existing GA property and the other one is your new GA4 property.
However, this new GA4 property will not automatically start collecting data. You would need to configure your GTM so that the data start following in your new property.
Step-5: Click on the ‘Tag Installation‘ button:

Step-6: Click on your web data stream:

Step-7: Click on ‘Use existing on-page tag‘ under the section ‘Tagging Instructions‘:

Step-8: Click on ‘Google Tag Manager’ drop-down menu:

You will now see the instructions for setting up a tag for tracking your website data in the new GA4 property via GTM:

Step-9: Take a note of the measurement ID.
Step-10: Navigate to your GTM account and then click on the ‘New Tag’ link:

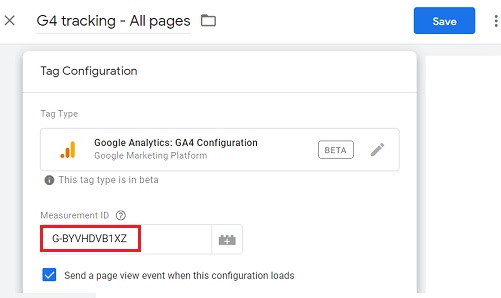
Step-11: Name your new tag something like G4 tracking – All pages and set the tag type to ‘Google Analytics: GA4 Configuration‘:

Step-12: Enter the measurement ID you recorded earlier in the ‘Measurement ID’ text box:
Step-13: Set your trigger to fire on all pages:

Step-14: Click on the ‘Save’ button.
Step-15: Click on the ‘Preview’ button at the top right-hand side:

The tag manager preview mode window would open in a new browser tab. If it doesn’t then it means your browser is blocking the window.
Step-16: Enter your website URL and then click on the ‘Start’ button:

Once you clicked on the ‘Start’ button one new tab will open up in your browser window which shows your website.
Step-17: Switch back to the browser tab which shows your tag manager preview mode window and then click on the ‘Continue’ button:

Step-18: If you see the tag G4 tracking – All pages under the Tags Firedsection then it means your tag is firing correctly:

Step-19: Navigate back to your GTM account and then click on the ‘Submit’ button:

Step-20: Give your version a name and then click on the ‘Publish’ button:

Step-21: Navigate to your website and visit a couple of pages.
Step-22: Navigate back to your GA4 property and then click on the cross button next to ‘Web stream details‘:

Step-23: Click on the ‘Real-time’ icon to open the real-time report:
You should now be able to see data in your real-time report:

Note: When you create a new property from within an existing GA property, the GA4 property is now the default option.
What if you already have a Google Analytics Apps+Web property?
If you already have a GA Apps+Web property set up (as I do) then you already have access to the GA4 property. This is because GA4 is just a new name for the Apps+Web property.
Now all you have to do is to connect your Apps+Web property to your GA3 property (the one which uses the analytics.js or gtag.js tracking) by following the steps below:
Step-1: Navigate to your GA3 property.
Step-2: Navigate to the admin section of your main reporting view.
Step-3: Click on the link ‘Upgrade to GA4‘ under the ‘Property’ column:

Step-4: Scroll down and then click on the drop-down menu ‘Select an existing Google Analytics 4 property‘:

Step-5: Select your existing ‘Apps+Web property’
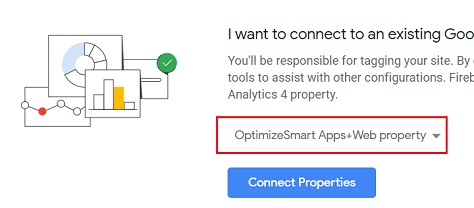
Step-6: Click on the ‘Connect Properties’ button. You should now see the following screen:

Your GA3 property is now connected to your Apps+Web property (aka GA4 property).
Step-7: Click on the ‘See your GA4 property‘ button.
Once you click on this button, you will be redirected to your existing Apps+web property. Remember GA4 is just a new name for your Apps+web property.
Step-8: Click on the ‘Property Settings’ link in your Apps+web property:

Step-9: Rename your property by removing the word ‘Apps+web’ and then adding the word ‘GA4’ somewhere like the one below:

Note: Even after you have created your new GA4 property or connected your existing GA3 property with your Apps+web property, you would continue to see the ‘upgrade to GA4’ option in your GA3 property:
However, when you again click on the ‘Upgrade to GA4‘ link, you should see the option to ‘See your GA4 property’ which confirms that you have successfully set up the GA4 property and also connected it with your old GA property:
